[vc_row content_placement=”middle” height=”medium” color_scheme=”alternate” us_bg_image=”697″ us_bg_size=”cover” us_bg_repeat=”repeat” us_bg_pos=”center center” us_bg_parallax=”none” us_bg_image_source=”media”][vc_column][us_post_title align=”center” tag=”h1″ migration_add_content=”1″ css=”%7B%22default%22%3A%7B%22margin-bottom%22%3A0%7D%7D”][us_breadcrumbs show_current=”1″ separator_icon=”material|chevron_right” align=”center” css=”%7B%22default%22%3A%7B%22font-size%22%3A%220.9rem%22%7D%7D”][/vc_column][/vc_row][vc_row][vc_column][vc_column_text]
Welcome to your new PRIME. Let us show you around. This guide shows you what’s in your PRIME box, helps you set it up, and gets you up and running with tips for optimal performance.
› Box Contents
› Setup Instructions
› Troubleshooting
[/vc_column_text][/vc_column][/vc_row][vc_row height=”auto”][vc_column][vc_raw_html]JTNDYSUyMG5hbWUlM0QlMjJjb250ZW50cyUyMiUzRSUzQyUyRmElM0UlM0NhJTIwbmFtZSUzRCUyMkNvbnRlbnRzJTIyJTNFJTNDJTJGYSUzRQ==[/vc_raw_html][/vc_column][/vc_row][vc_row height=”auto” css=”%7B%22default%22%3A%7B%22padding-top%22%3A%2216px%22%7D%7D”][vc_column][vc_column_text]
PRIME Box Contents
[/vc_column_text][/vc_column][/vc_row][vc_row height=”small”][vc_column][us_image image=”5392″ size=”full” align=”center”][/vc_column][/vc_row][vc_row height=”auto”][vc_column][vc_raw_html]JTNDYSUyMG5hbWUlM0QlMjJzZXR1cCUyMiUzRSUzQyUyRmElM0UlM0NhJTIwbmFtZSUzRCUyMlNldFVwJTIyJTNFJTNDJTJGYSUzRQ==[/vc_raw_html][/vc_column][/vc_row][vc_row height=”auto” css=”%7B%22default%22%3A%7B%22padding-top%22%3A%2264px%22%7D%7D”][vc_column][vc_column_text]
Setup Instructions
[/vc_column_text][/vc_column][/vc_row][vc_row height=”small”][vc_column][vc_column_text]
1. Download CEL-FI WAVE
Go to the App Store or the Google Play Store and search for “CEL-FI WAVE” to download the free app.
[/vc_column_text][vc_column_text css=”%7B%22default%22%3A%7B%22padding-top%22%3A%228px%22%7D%7D”]![]()
![]() [/vc_column_text][/vc_column][/vc_row][vc_row height=”small”][vc_column][vc_column_text]
[/vc_column_text][/vc_column][/vc_row][vc_row height=”small”][vc_column][vc_column_text]
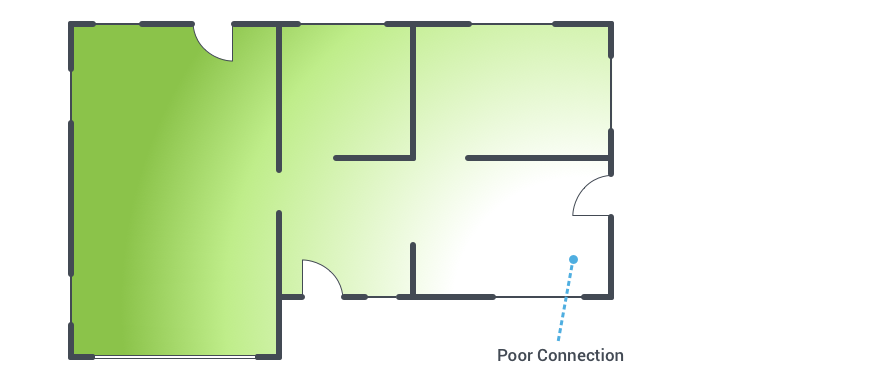
2. Determine where coverage is needed
Use the signal bars on your phone to find the room/area where you need coverage.
[/vc_column_text][/vc_column][/vc_row][vc_row height=”small”][vc_column][vc_column_text]
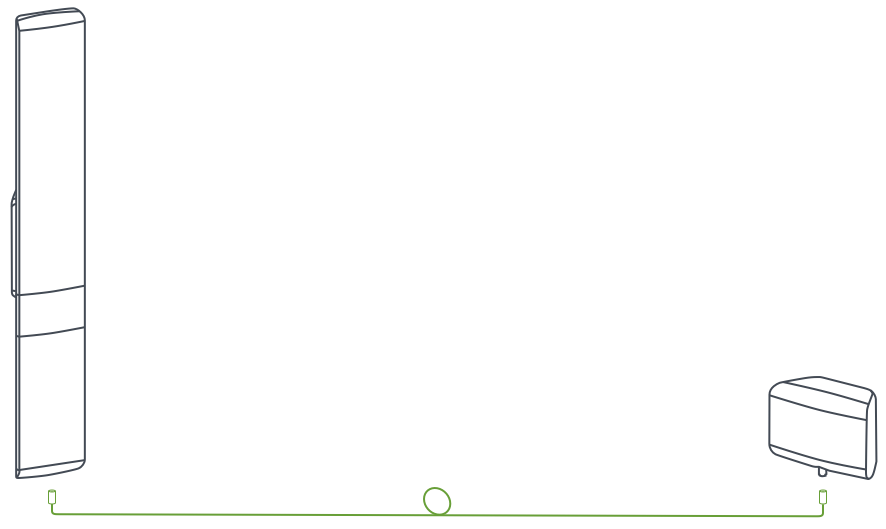
3. Connect the units
Connect the Smart Signal Booster to the Coverage Unit (Power Supply) with the cable provided. Do not plug the Coverage Unit into the wall yet.
[/vc_column_text][/vc_column][/vc_row][vc_row height=”small”][vc_column][vc_column_text]
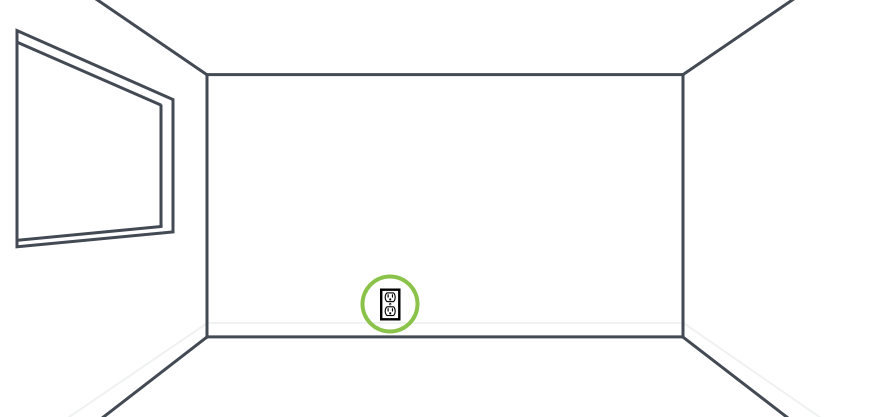
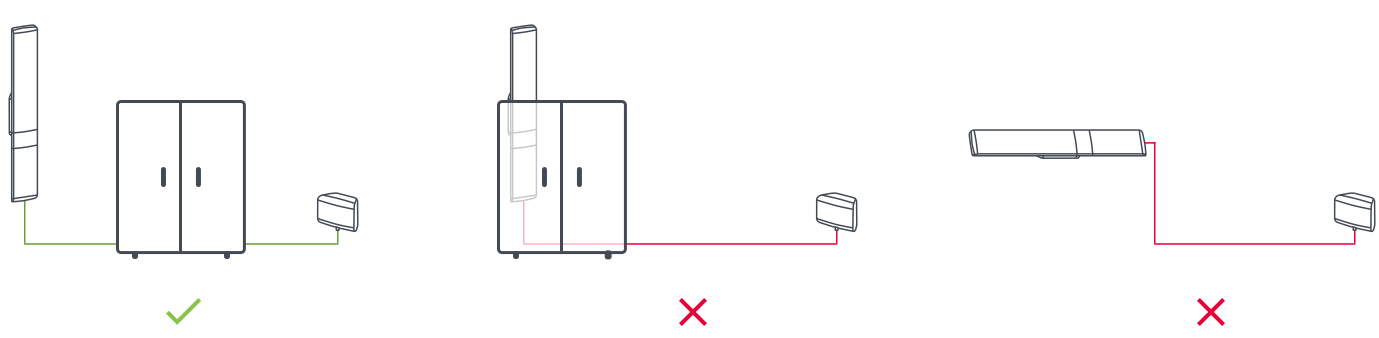
4. Locate an open power outlet
Find an open power outlet in the room/area identified in step 2. Plug the Coverage Unit into the power outlet and wait for the system to start up. The system is ready to use when you see a solid blue light on the front of the Smart Signal Booster. See the Troubleshooting guide for some of the common problems you may encounter with your system. The power outlet should not be behind any large objects, such as furniture, as this will interfere with the signal. It is acceptable if the Coverage Unit is rotated in any direction. It will function normally in any position, but for best results, we recommend a vertical orientation.
Do’s and Don’ts
[/vc_column_text][/vc_column][/vc_row][vc_row height=”small”][vc_column][vc_column_text]
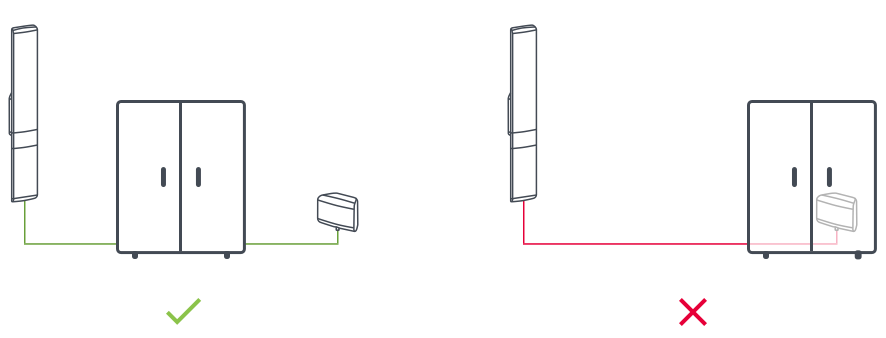
5. Find a location for the Smart Signal Booster
Position the Smart Signal Booster on the wall as far from the Coverage Unit as possible (this will improve isolation). Approximately 2 meters above the floor in a vertical position. Typically, closest to the building exterior is the ideal location. Make sure the Smart Signal Booster is not blocked or covered by large objects such as furniture.
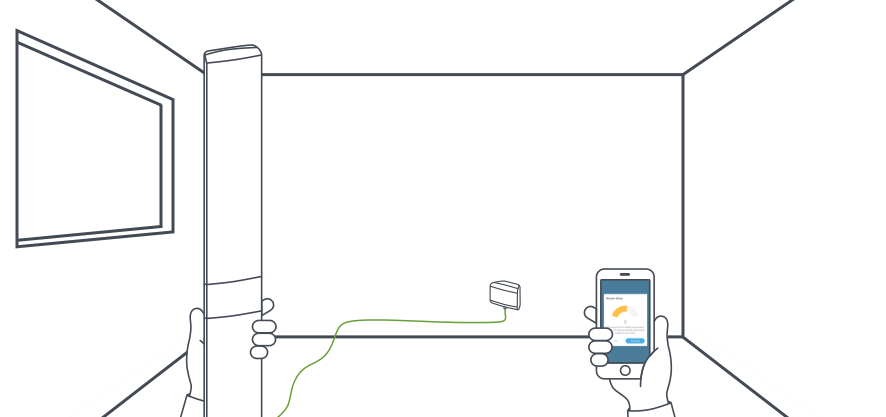
Do’s and Don’ts
[/vc_column_text][/vc_column][/vc_row][vc_row height=”small”][vc_column][vc_column_text]
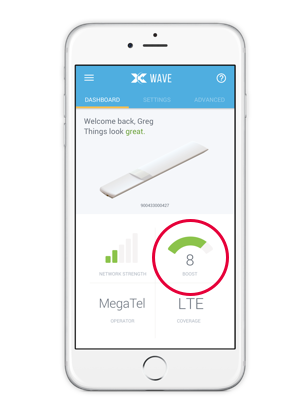
6. Confirm and optimize your placement
Once the system is boosting, run the WAVE app (downloaded in step 1) to check your boost number. If you are satisfied with the boost number and signal improvement, proceed to step 7. To optimize the boost repeat steps 4 through 6.
 [/vc_column_text][/vc_column][/vc_row][vc_row height=”small”][vc_column][vc_column_text]
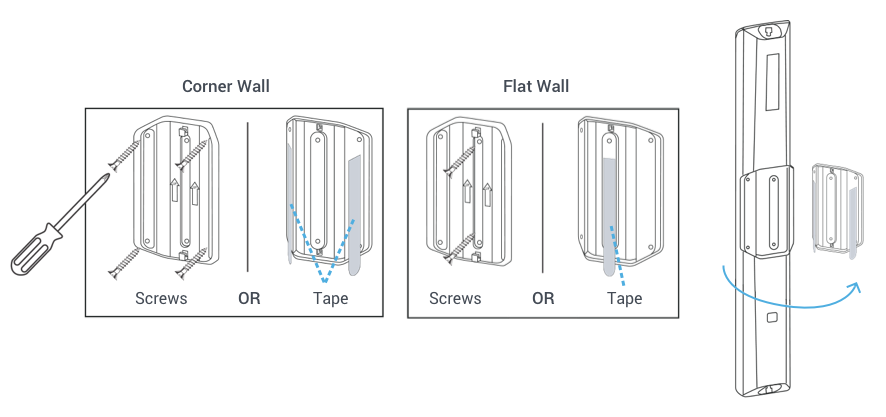
7. Mount the system
The mounting bracket for the Smart Signal Booster can be installed either on a flat surface or in a corner. Use either the supplied double sided tape or screw kit (you do not need both). If you are using tape, make sure it is placed to extend below the mounting bracket for easy removal. Attach the Smart Signal Booster to the mounting bracket. Remember, make sure the Smart Signal Booster is mounted vertically.
 [/vc_column_text][/vc_column][/vc_row][vc_row height=”small”][vc_column][vc_column_text]
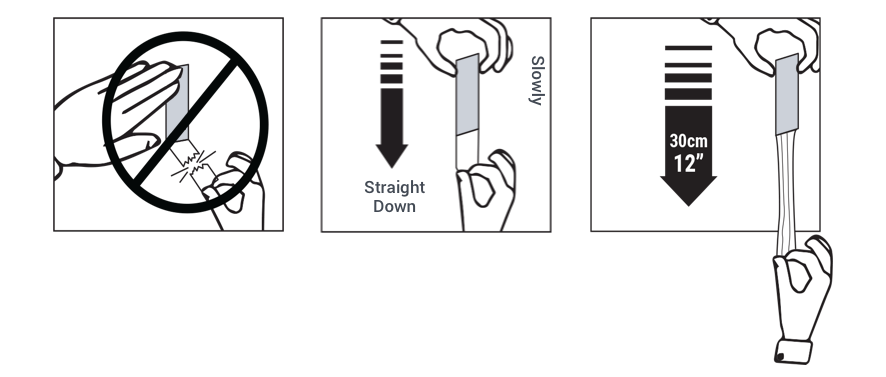
Tape removal (as needed)
To prevent damage when removing the mount from wall, it is important to never pull the tape strip towards you. Pull the tape slowly in straight down direction/motion.
 [/vc_column_text][/vc_column][/vc_row][vc_row][vc_column][us_separator size=”custom” height=”32px”][/vc_column][/vc_row]